

- February 6, 2022
- Posted by: MasterAdmin
- Category: Cryptocurrency

Last summer, my wife and I watched a program called “StartUp” on Netflix. The three-season series features the challenges faced by a cast of characters to create “GenCoin,” a new (and fictional) digital currency. As I watched the show, I wondered how my life would be different if I were a member of the engineering team driving GenCoin adoption.
While products like GenCoin originated with the purpose of providing a new way to perform financial transactions, the underlying concepts are more powerful than just currency-related tasks. In fact, the distributed nature in how blockchain is designed ties directly to the heart of Web3.
Before going any further, let’s recap the three main eras of the web:
Web1 – static web pages (1991 – 2004)
Web2 – web as a platform (since 2004)
Web3 – decentralized design, incorporates blockchain technologies (since 2009, but has really gained momentum over the last several years)
Web3 provides an alternative for the web2 reality where control is centralized into a handful of technology providers such as Google, Apple, and Amazon. Web3 creates a permissionless datastore where no one person or corporation controls or owns the data, yet that data is still guaranteed to be true. The data is stored on the public ledgers of a blockchain network. So instead of one entity owning the data, multiple nodes (computers running the blockchain) store the data and come to a consensus about whether the data is valid or not.
The protocol to create such a datastore (which began with Bitcoin and continued with protocols such as Ethereum and others) is the foundation of web3 and opens a wide variety of new use cases, such as:
Personal identity is controlled by the user, not a corporation (such as MetaMask)
A permissionless financial system (Bitcoin and other digital currencies that enable permissionless loans, currencies, investing, and so on)
Provable digital ownership of digital items, such as music, art, and more through the utility of NFTs
Ad-hoc formation of groups with a like purpose through decentralized autonomous organizations (DAO), such as the Constitution DAO or social DAO Friends with Benefits
Play-to-earn games (p2e) where users can earn a living by playing a game (such as Axie Infinity)
The key to all of the above, of course, is that the ownership of the digital currency—DAO membership, music rights, and so on—is in the hands of the user and controlled by the user. Anyone, anywhere in the world with an internet connection can freely trade, sell, and build upon those items. There is no centralized company or government in control and making the rules.
How close to this ideal web3 has come or can come—and if it’s a good thing or not—is an in-depth conversation with many strong (and strongly biased) opinions. I won’t get into that here. Something else to mention is that web3 is not expected to replace web2, in the same manner by which web2 did not replace web1. All three will have their place in the future.
Let’s put debate aside and instead look at how you, as a developer, can explore the technical side of this new web3 world.
Transforming from Full-Stack to Web3 Stack
The Full-Stack Developer term gained momentum around 2015, offering the benefit that a single software engineer could contribute to any level of the software stack. As a result, if a feature or bug related to the service tier was logged, the same developer who just finished a client-related task could pick up the ticket and be productive.
Despite one’s opinion of full-stack developers, the focus now should shift to thinking about what the web3 stack looks like and how software engineers will introduce features and functionality in this next generation of web development.
Basics of Web3
Diving into web3 in detail would involve a lengthy series of articles. We’re going to keep it high level and provide an overview with some links to additional resources. We’ll look at the typical first steps: creating a smart contract and then a Dapp to interact with that smart contract.
A smart contract is a piece of code deployed on the blockchain (in our case below, on Ethereum). This code is immutable and permissionless. Once you deploy it, it exists on the blockchain, can’t be changed, and anyone can retrieve it.
A dapp (decentralized application) is how we will interact with that smart contract from our UI (typically a web page or app). A dapp is utilizing the open nature of smart contracts on the back end. It can also be stored in a decentralized file storage such as IPFS (InterPlanetary File Storage) so there is no chance of downtime. DDOS attacks are also extremely difficult to execute because you would have to attack every single node the site is stored on.
Conversely, security and testing is much more important though. Flaws and vulnerabilities in the code need to be ironed out before deployment is considered.
Let’s walk through this in more detail.
The Web3 Stack
A combination of proven technologies and purpose-driven technologies exists for software engineers seeking to dive into the web3 end of the pool. One very popular stack includes the following components:
NPM – node package manager, very popular for web2 developers
The Truffle Framework – development tools focusing on web3
Ganache – allows launching a private blockchain on a local machine
MetaMask – blockchain user interface/gateway to Ethereum (open source decentralized blockchain)
Solidity – leading smart contract programming language
HTML/CSS/JavaScript – client layer
Web3.js – Ethereum API library to interact with Ethereum network
Infura – Ethereum API service which grants access to Ethereum network
Ethereum Dapp Overview
Let’s assume a homeowner’s association is about to host their periodic elections, where residents in the neighborhood vote on a series of decisions. Since the neighborhood contains a group of IT professionals eager to become web3 pioneers, they decide to build an Ethereum Dapp for the election.
Why would this be a good example?
Using a Dapp to store the votes provides results that are indisputable. If set up correctly, the ability to tamper or fake votes is non-existent because data is stored publicly on the blockchain rather than on the private server of a single company. Anyone could retrieve the vote results in a permission-less manner by interacting with the smart contract.
Smart Contract Creation
The first step is to create our Smart Contract for use with the application, which utilizes the following components of the web3 stack:
Infura
NPM
The Truffle Framework
Ganache
Solidity
The creation of a Smart Contract follows a flow similar to the illustration below:
This flow has been fully detailed by the team at ConsenSys:
Creating the Dapp using React
With the Smart Contact in place, web3 engineers can focus on building the application which will be used by the association’s election. The following web3 stack components remain from the list above:
NPM
MetaMask
HTML/CSS/JavaScript/React
Web3.js
For this example, we are going to leverage the React framework, which will utilize the following flow:
Now, let’s build something from the ground up.
My First Ethereum Dapp
After creating a free account at Infura, I created a new project called jvc-homeowners-ballot:
The new project contains the following details, which I will reference later:
Getting Started with Truffle
On my local machine, I created a matching folder, called jvc-homeowners-ballot and then initialized Truffle using the following CLI command:
truffle init
The initialization results in the following directory structure:
├── contracts
│ └── Migrations.sol
├── migrations
│ └── 1_initial_migration.js
├── test
└── truffle-config.js
The Truffle-based wallet provider dependency was added next:
npm install –save @truffle/hdwallet-provider
In order to create a local development network, the Ganache CLI was launched using the following command:
ganache
The CLI responded with the following information and Ganache is now running on port #8545 of my local machine:
ganache v7.0.1 (@ganache/cli: 0.1.2, @ganache/core: 0.1.2)
Starting RPC server
Available Accounts
==================
(0) 0x2B475e4fd7F600fF1eBC7B9457a5b58469b9EDDb (1000 ETH)
(1) 0x5D4BB40f6fAc40371eF1C9B90E78F82F6df33977 (1000 ETH)
(2) 0xFaab2689Dbf8b7354DaA7A4239bF7dE2D97e3A22 (1000 ETH)
(3) 0x8940fcaa55D5580Ac82b790F08500741326836e0 (1000 ETH)
(4) 0x4c7a1b7EB717F98Fb0c430eB763c3BB9212F49ad (1000 ETH)
(5) 0x22dFCd5df8d4B19a42cB14E87219fea7bcA7C92D (1000 ETH)
(6) 0x56882f79ecBc2D68947C6936D4571f547890D07c (1000 ETH)
(7) 0xD257AFd8958c6616bf1e61f99B2c65dfd9fEE95A (1000 ETH)
(8) 0x4Bb2EE0866578465E3a2d3eCCC41Ea2313372B20 (1000 ETH)
(9) 0xdf267AeFeAfE4b7053ca10c3d661a8CB24E98236 (1000 ETH)
Private Keys
==================
(0) 0x5d58d27b0f294e3222bbd99a3a1f07a441ea4873de6c3a2b7c40b73186eb616d
(1) 0xb9e52d6cfb2c074fa6a6578b946e3d00ea2a332bb356d0b3198ccf909a97fdc8
(2) 0xc52292ce17633fe2724771e81b3b4015374d2a2ea478891dab74f2028184edeb
(3) 0xbc7b0b4581592e48ffb4f6420228fd6b3f954ac8cfef778c2a81188415274275
(4) 0xc63310ccdd9b8c2da6d80c886bef4077359bb97e435fb4fe83fcbec529a536fc
(5) 0x90bc16b1520b66a02835530020e43048198195239ac9880b940d7b2a48b0b32c
(6) 0x4fb227297dafb879e148d44cf4872611819412cdd1620ad028ec7c189a53e973
(7) 0xf0d4dbe2f9970991ccc94a137cfa7cf284c09d0838db0ce25e76c9ab9f4316d9
(8) 0x495fbc6a16ade5647d82c6ad12821667f95d8b3c376dc290ef86c0d926f50fea
(9) 0x434f5618a3343c5e3b0b4dbeaf3f41c62777d91c3314b83f74e194be6c09416b
HD Wallet
==================
Mnemonic: immense salmon nominee toy jungle main lion universe seminar output oppose hungry
Base HD Path: m/44’/60’/0’/0/{account_index}
Default Gas Price
==================
2000000000
BlockGas Limit
==================
30000000
Call Gas Limit
==================
50000000
Chain Id
==================
1337
RPC Listening on 127.0.0.1:8545
Within my project folder, the truffle-config.js file was updated to activate the following lines:
development: {
host: “127.0.0.1”, // Localhost (default: none)
port: 8545, // Standard Ethereum port (default: none)
network_id: “*”, // Any network (default: none)
},
Now, the Truffle console can be launched in a new terminal window:
truffle console
… which results in a simple console:
truffle(development)>
The console can be used to create a wallet:
const HDWalletProvider = require(‘@truffle/hdwallet-provider’);
This should result in a response of undefined. This is okay.
Next, we need a 12-word mnemonic phrase, so I used the Mnemonic Code Converter site to generate one.
I then used that 12-word phrase to update the Truffle console:
const mnemonic = ’12 words here’;
const wallet = new HDWalletProvider(mnemonic, “http://localhost:8545”);
Both of these also resulted in a response of undefined, but the wallet console provided results that the commands actually worked, as shown below:
truffle(development)> wallet
HDWalletProvider {
walletHdpath: “m/44’/60’/0’/0/”,
wallets: {
…
},
addresses: [
‘0xa54b012b406c01dd99a6b18ef8b55a15681449af’,
‘0x6d507a70924ea3393ae1667fa88801650b9964ad’,
‘0x1237e0a8522a17e29044cde69b7b10b112544b0b’,
‘0x80b4adb18698cd47257be881684fff1e14836b4b’,
‘0x09867536371e43317081bed18203df4ca5f0490d’,
‘0x89f1eeb95b7a659d4748621c8bdbabc33ac47bbb’,
‘0x54ceb6f0d722dcb33152c953d5758a08045f254d’,
‘0x25d2a8716792b98bf9cce5781b712f00cf33227e’,
‘0x37b6364fb97028830bfeb0cb8d2b14e95e2efa05’,
‘0xe9f56031cb6208ddefcd3cdd5a1a41f7f3400af5’
],
…
Adding ETH Funds for Testing
Now we need to acquire some test funds for our Dapp and will use Ropsten Ethereum Faucet to add funds to my existing MetaMask wallet, created by ConsenSys. Keep in mind, you can create multiple accounts in MetaMask, where at least one account is dedicated for development and testing. Doing so reduces the risk of accidentally losing real funds. Also, never share your seed phrase with anyone and never upload your private key … anywhere!
To add some test funds, I only had to include my account address:
Using the Ropsten Etherscan site, we can validate the transaction completed successfully:
Final Preparation Steps
The dotenv dependency was added to the project using the following command:
npm install –save dotenv
Next, a new file called .env was created at the root of the project and contained the following two lines:
INFURA_API_KEY=INSERT YOUR API KEY HERE (no quotations)
MNEMONIC=”12 words here”
The INFURA_API_KEY is the Project ID that was given when the jvc-homeowners-ballot project was created.
Important note: Make sure the .env file is included in the .gitignore file to avoid this secret information from being available to others with access to the repository.
The last preparation step is to update the truffle-config.js file. First, we need to add the following lines at the top of the file:
require(“dotenv”).config();
const HDWalletProvider = require(“@truffle/hdwallet-provider”);
Next, we need to add the following network, which will leverage the dotenv dependency added above:
ropsten: {
provider: () =>
new HDWalletProvider(
process.env.MNEMONIC,
`https://ropsten.infura.io/v3/${process.env.INFURA_API_KEY}`
),
network_id: 3, // Ropsten’s id
gas: 5500000, // Ropsten has a lower block limit than mainnet
confirmations: 2, // # of confs to wait between deployments. (default: 0)
timeoutBlocks: 200, // # of blocks before a deployment times out (minimum/default: 50)
skipDryRun: true // Skip dry run before migrations? (default: false for public nets )
},
Setting Up the Smart Contract
With Infura and Truffle in place and some test funds in our account, it’s time to focus on our smart contract.
For the homeowner’s association election, we will use the following contract, which is called JvcHomeownerBallot.sol and located in the contracts folder of the project:
// SPDX-License-Identifier: UNLICENSED (it is common practice to include an open source license or declare it unlicensed)
pragma solidity ^0.8.7; // tells the compiler which version to use
contract Homeowners {
// store the addresses of voters on the blockchain in these 2 arrays
address[] votedYes;
address[] votedNo;
function voteYes() public {
votedYes.push(msg.sender);
}
function voteNo() public {
votedNo.push(msg.sender);
}
function getYesVotes() public view returns (uint) {
return votedYes.length;
}
function getNoVotes() public view returns (uint) {
return votedNo.length;
}
}
For this example our contract will be quite simple, where voters can either select Yes or No for whatever question is on the ballot.
At this point the contracts folder appears as shown below:
.
├── JvcHomeownersBallot.sol
└── Migrations.sol
With the contract in place, we need to establish a way to deploy the contract. This is where the migrations folder comes into place. The following contents were added to a 2_deploy_contracts.js file inside the migrations folder:
const JvcHomeownersBallot = artifacts.require(“JvcHomeownersBallot.sol”);
module.exports = function(deployer) {
deployer.deploy(JvcHomeownersBallot);
};
Now, we can perform the migration of the contract using the following command:
truffle migrate –network ropsten
The migrate keyword provides the following response:
Compiling your contracts…
===========================
> Compiling ./contracts/JvcHomeownersBallot.sol
> Artifacts written to /Users/john.vester/projects/jvc/consensys/jvc-homeowners-ballot/build/contracts
> Compiled successfully using:
– solc: 0.8.11+commit.d7f03943.Emscripten.clang
Network up to date.
truffle(development)> truffle migrate –network ropsten
Compiling your contracts…
===========================
> Compiling ./contracts/JvcHomeownersBallot.sol
> Compiling ./contracts/Migrations.sol
> Artifacts written to /Users/john.vester/projects/jvc/consensys/jvc-homeowners-ballot/build/contracts
> Compiled successfully using:
– solc: 0.8.11+commit.d7f03943.Emscripten.clang
Starting migrations…
======================
> Network name: ‘ropsten’
> Network id: 3
> Block gas limit: 8000000 (0x7a1200)
1_initial_migration.js
======================
Deploying ‘Migrations’
———————-
> transaction hash: 0x5f227f26a31a3667a689be2d7fa6121a21153eb219873f6fc9aecede221b3b82
> Blocks: 5 Seconds: 168
> contract address: 0x9e6008B354ba4b9f91ce7b8D95DBC6130324024f
> block number: 11879583
> block timestamp: 1643257600
> account: 0xa54b012B406C01dd99A6B18eF8b55A15681449Af
> balance: 1.573649230299520359
> gas used: 250142 (0x3d11e)
> gas price: 2.506517682 gwei
> value sent: 0 ETH
> total cost: 0.000626985346010844 ETH
Pausing for 2 confirmations…
——————————
> confirmation number: 1 (block: 11879584)
> confirmation number: 2 (block: 11879585)
> Saving migration to chain.
> Saving artifacts
————————————-
> Total cost: 0.000626985346010844 ETH
2_deploy_contracts.js
=====================
Deploying ‘JvcHomeownersBallot’
——————————-
> transaction hash: 0x1bf86b0eddf625366f65a996e633db589cfcef1a4d6a4d6c92a5c1f4e63c767f
> Blocks: 0 Seconds: 16
> contract address: 0xdeCef6474c95E5ef3EFD313f617Ccb126236910e
> block number: 11879590
> block timestamp: 1643257803
> account: 0xa54b012B406C01dd99A6B18eF8b55A15681449Af
> balance: 1.573133154908720216
> gas used: 159895 (0x27097)
> gas price: 2.507502486 gwei
> value sent: 0 ETH
> total cost: 0.00040093710999897 ETH
Pausing for 2 confirmations…
——————————
> confirmation number: 1 (block: 11879591)
> confirmation number: 2 (block: 11879592)
> Saving migration to chain.
> Saving artifacts
————————————-
> Total cost: 0.00040093710999897 ETH
Summary
=======
> Total deployments: 2
> Final cost: 0.001027922456009814 ETH
– Blocks: 0 Seconds: 0
– Saving migration to chain.
– Blocks: 0 Seconds: 0
– Saving migration to chain.
At this point we have deployed the JvcHomeownersBallot smart contract to the Ropsten network. The smart contract can be verified using the following URL and providing the contract address in the “Deploying JvcHomeownersBallot” logs:
Or … in this case:
https://ropsten.etherscan.io/address/0xdeCef6474c95E5ef3EFD313f617Ccb126236910e
Creating the Dapp Using React
For the prior steps, I used a folder called jvc-homeowners-ballot. On that same level, I will create a React application called jvc-homeowners-ballot-client using the React CLI:
npx create-react-app jvc-homeowners-ballot-client
Next, I changed directories into the newly-created folder and executed the following to install the web3 dependency into the React application:
cd jvc-homeowners-ballot-client
npm install web3
With the core React application ready, a contract application binary interface (ABI) needs to be established to allow our Dapp to communicate with contracts on the Ethereum ecosystem. Based upon the contents of the JvcHomeownerBallot.sol smart contract file, I navigated to the build/contracts folder and opened the JvcHomeownersBallet.json file and used the values for the “abi” property for the jvcHomeOwnersBallot constant of the abi.js file as shown below:
export const jvcHomeownersBallot = [
{
“inputs”: [],
“name”: “voteYes”,
“outputs”: [],
“stateMutability”: “nonpayable”,
“type”: “function”
},
{
“inputs”: [],
“name”: “voteNo”,
“outputs”: [],
“stateMutability”: “nonpayable”,
“type”: “function”
},
{
“inputs”: [],
“name”: “getYesVotes”,
“outputs”: [
{
“internalType”: “uint256”,
“name”: “”,
“type”: “uint256”
}
],
“stateMutability”: “view”,
“type”: “function”,
“constant”: true
},
{
“inputs”: [],
“name”: “getNoVotes”,
“outputs”: [
{
“internalType”: “uint256”,
“name”: “”,
“type”: “uint256”
}
],
“stateMutability”: “view”,
“type”: “function”,
“constant”: true
}
];
This file was placed into a newly-created abi folder inside the src folder of the React application.
Now, the React Apps.js file needs to be updated. Let’s first start with the top of the file, which needs to be configured as shown below:
import React, { useState } from “react”;
import { jvcHomeownersBallot } from “./abi/abi”;
import Web3 from “web3”;
import “./App.css”;
const web3 = new Web3(Web3.givenProvider);
const contractAddress = “0xdeCef6474c95E5ef3EFD313f617Ccb126236910e”;
const storageContract = new web3.eth.Contract(jvcHomeownersBallot, contractAddress);
The contactAddress can be found a number of ways. In this case, I used the results in the truffle – migrate CLI command. Another option is to use the Etherscan site.
Standard React Development
At this point, standard React development can take over. The finished App.js file will look like this:
import React, { useState } from “react”;
import { jvcHomeownersBallot } from “./abi/abi”;
import Web3 from “web3”;
import Nav from “./components/Nav.js”;
import “./App.css”;
import { makeStyles } from “@material-ui/core/styles”;
import Button from “@material-ui/core/Button”;
import {CircularProgress, Grid, Typography} from “@material-ui/core”;
const useStyles = makeStyles((theme) => ({
root: {
“& > *”: {
margin: theme.spacing(1),
},
},
}));
const web3 = new Web3(Web3.givenProvider);
const contractAddress = “0xdeCef6474c95E5ef3EFD313f617Ccb126236910e”;
const storageContract = new web3.eth.Contract(jvcHomeownersBallot, contractAddress);
function App() {
const classes = useStyles();
const [voteSubmitted, setVoteSubmitted] = useState(“”);
const [yesVotes, setYesVotes] = useState(0);
const [noVotes, setNoVotes] = useState(0);
const [waiting, setWaiting] = useState(false);
const getVotes = async () => {
const postYes = await storageContract.methods.getYesVotes().call();
setYesVotes(postYes);
const postNo = await storageContract.methods.getNoVotes().call();
setNoVotes(postNo);
};
const voteYes = async () => {
setWaiting(true);
const accounts = await window.ethereum.enable();
const account = accounts[0];
const gas = (await storageContract.methods.voteYes().estimateGas()) * 1.5;
const post = await storageContract.methods.voteYes().send({
from: account,
gas,
});
setVoteSubmitted(post.from);
setWaiting(false);
};
const voteNo = async () => {
setWaiting(true);
const accounts = await window.ethereum.enable();
const account = accounts[0];
const gas = (await storageContract.methods.voteNo().estimateGas() * 1.5);
const post = await storageContract.methods.voteNo().send({
from: account,
gas,
});
setVoteSubmitted(post.from);
setWaiting(false);
};
return (
<div className={classes.root}>
<Nav ></Nav>
<div className=”main”>
<div className=”card”>
<Typography variant=”h3″ gutterBottom>
JVC Homeowners Ballot
</Typography>
<Typography gutterBottom>
How do you wish to vote?
</Typography>
<span className=”buttonSpan”>
<Button
id=”yesButton”
className=”button”
variant=”contained”
color=”primary”
type=”button”
onClick={voteYes}>Vote Yes</Button>
<div className=”divider”></div>
<Button
id=”noButton”
className=”button”
color=”secondary”
variant=”contained”
type=”button”
onClick={voteNo}>Vote No</Button>
<div className=”divider”></div>
</span>
{waiting && (
<div>
<CircularProgress ></CircularProgress>
<Typography gutterBottom>
Submitting Vote … please wait
</Typography>
</div>
)}
{!waiting && voteSubmitted && (
<Typography gutterBottom>
Vote Submitted: {voteSubmitted}
</Typography>
)}
<span className=”buttonSpan”>
<Button
id=”getVotesButton”
className=”button”
color=”default”
variant=”contained”
type=”button”
onClick={getVotes}>Get Votes</Button>
</span>
{(yesVotes > 0 || noVotes > 0) && (
<div>
<Typography variant=”h5″ gutterBottom>
Current Results
</Typography>
<Grid container spacing={1}>
<Grid item xs={6}>
<div className=”resultsAnswer resultsHeader”>Vote</div>
</Grid>
<Grid item xs={6}>
<div className=”resultsValue resultsHeader”># of Votes</div>
</Grid>
<Grid item xs={6}>
<div className=”resultsAnswer”>Yes</div>
</Grid>
<Grid item xs={6}>
<div className=”resultsValue”>{yesVotes}</div>
</Grid>
<Grid item xs={6}>
<div className=”resultsAnswer”>No</div>
</Grid>
<Grid item xs={6}>
<div className=”resultsValue”>{noVotes}</div>
</Grid>
</Grid>
</div>
)}
</div>
</div>
</div>
);
}
export default App;
Dapp in Action
To start the React-based Dapp, the Yarn CLI can be used:
yarn start
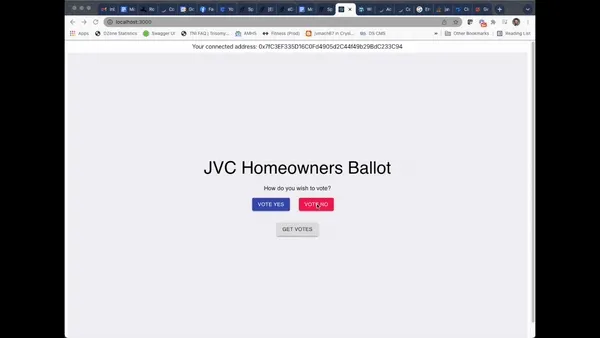
Once compiled and validated, the application will appear on the screen, as shown below:
At this point, three options are available:
VOTE YES – submits a Yes vote
VOTE NO – submits a No vote
GET VOTES – enables a new section of the Dapp, showing a total of Yes and No votes.
After voting YES the first time, I created the following video to submit a NO vote and then use the GET VOTES button:
This video can also be found on YouTube.
What We Learned
With the Smart Contract established, the remaining tasks for the web3 pioneer are not considerably different from a client perspective:
Existing JavaScript client frameworks made popular by web2 projects can continue to be utilized.
NPM is also leveraged to include dependencies to allow web3 development.
The web3, Truffle, and MetaMask libraries allow the application to interact with data, similar to how web2 applications interact with a traditional datastore.
Business rules and UI/UX designs continue to meet acceptance criteria for features and functionality required by the product owner.
Where web3 applications differ from their predecessors is that it doesn’t matter who is seeking information stored within the smart contract within the blockchain. The answer is always the same, providing a single source of truth when making requests for information.
In the simple use case of the homeowner’s association election, no matter how many times the ballots are queried, the results will always be exactly the same—even if a second Dapp is written to access the same data.
Conclusion
Since last year, I have been trying to live by the following mission statement, which I feel can apply to any IT professional:
“Focus your time on delivering features/functionality that extends the value of your intellectual property. Leverage frameworks, products, and services for everything else.”
– J. Vester
Web3 Dapps certainly adhere to my personal mission statement on multiple levels:
There is a single source of truth when building Dapps on a blockchain, providing reliable data for consumers of the information.
The burden of knowing “who” is involved in the transaction is no longer a requirement, allowing Dapps to focus solely on the business rules of the application.
Because of its distributed nature, control is returned back to the consumer and out of the hands of a select few.
Full-stack developers seeking to become web3 pioneers have a collection of tooling without a hefty learning curve. The frameworks and libraries can help software engineers explore and design against the next generation of web development.
If you are interested in the source code used by this project, both repositories are available on GitLab:
https://gitlab.com/johnjvester/jvc-homeowners-ballot
https://gitlab.com/johnjvester/jvc-homeowners-ballot-client
Have a really great day!
Also published on: https://dzone.com/articles/moving-from-full-stack-developer-to-web3-pioneer
