

- February 19, 2022
- Posted by: MasterAdmin
- Category: Altcoins
Part 1: Intro
In this article, I’ll try to give a brief but complete overview of what generative art is, how it is connected to NFTs, and how one can start making generative things on a blockchain. I’ll try to answer all these questions based on my personal experience of making and releasing an NFT collection of generative mushrooms written in javascript.
Background
I love to code unusual things just for fun. During the New Year holidays, I was spammed so hard by news about NFTs that I finally decided to try to make something creative in this paradigm. I was never excited by the idea of uploading JPEGs onto a blockchain, but the possibility of onchain generative art grabbed my attention.
\
Briefly, the idea behind it is to make some token generator that gives you a unique art object each time you “mint” it (in actuality, call a method in the blockchain which spends some of your money on its execution and also gives some money to the artist). Definitely, there is some magic in the feeling that your transaction generates a unique object which will be stored into the blockchain forever, isn’t it?
\
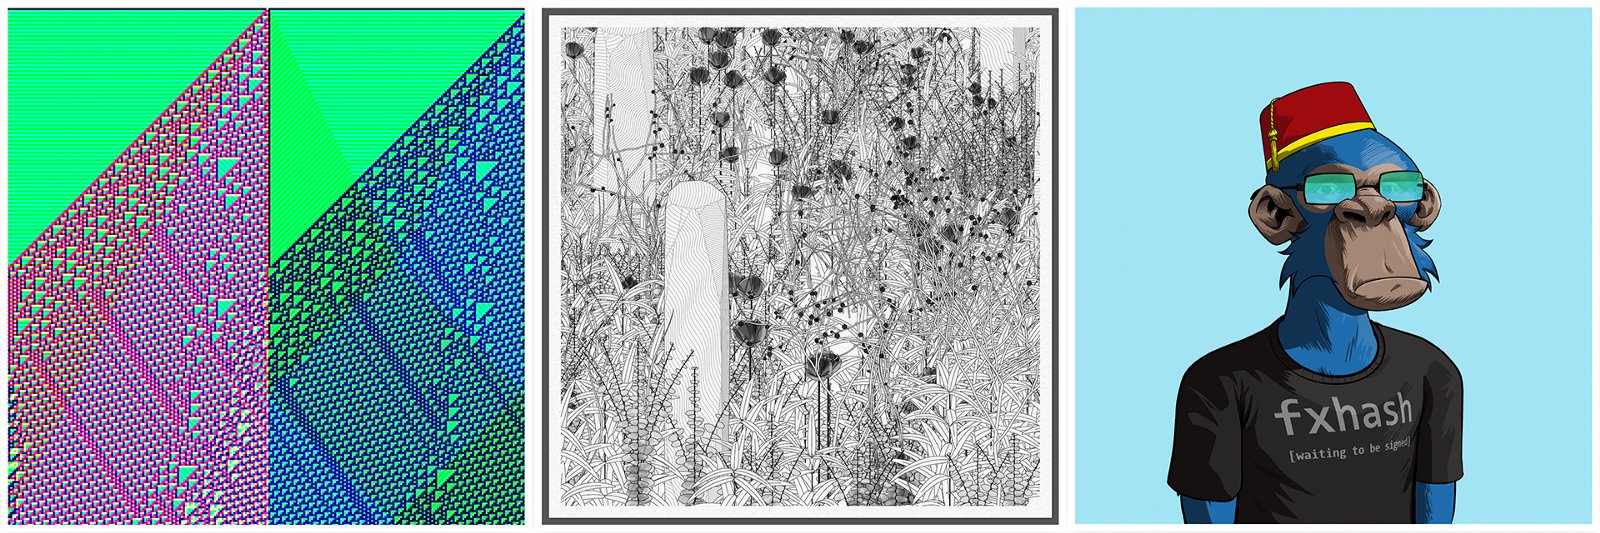
There are some art platforms that exploit this idea, the most famous of them is artblocks.io. But as it is has a lot of bureaucracy to enter and also it is built on the Ethereum blockchain, which still uses proof-of-work and has a very high gas price, I decided to try myself on a more democratic, cheap, and eco-friendly platform – fxhash.xyz
What is a generative NFT artwork?
All the generative NFTs are basically webpages that draw something on the canvas using either vanilla javascript or some third-party libraries. Taking a stab at classification, from my perspective I’d broadly divide all generative NFTs into 3 categories: abstract math artworks, concrete procedural artworks, and variative hand-drawn artworks.
\
The first class, abstract math, utilizes some mathematical concepts to generate an abstract image: there may be some fractals, attractors, cellular automatons, etc. Procedural arts are trying to describe some concrete things using parametrizations. And the third class, variative hand-drawn, is usually simple randomization of some pre-drawn parts of the image.
\
Also, there are some experimental and interactive works, even modular synthesizers and games, but these are much rarer.
\
\
So what we will do during this article is to describe a procedural model of a mushroom and randomize it using the transaction hash. Combined with an artistic vision, composition, and stylization this gives us what’s called a generative NFT artwork.
\
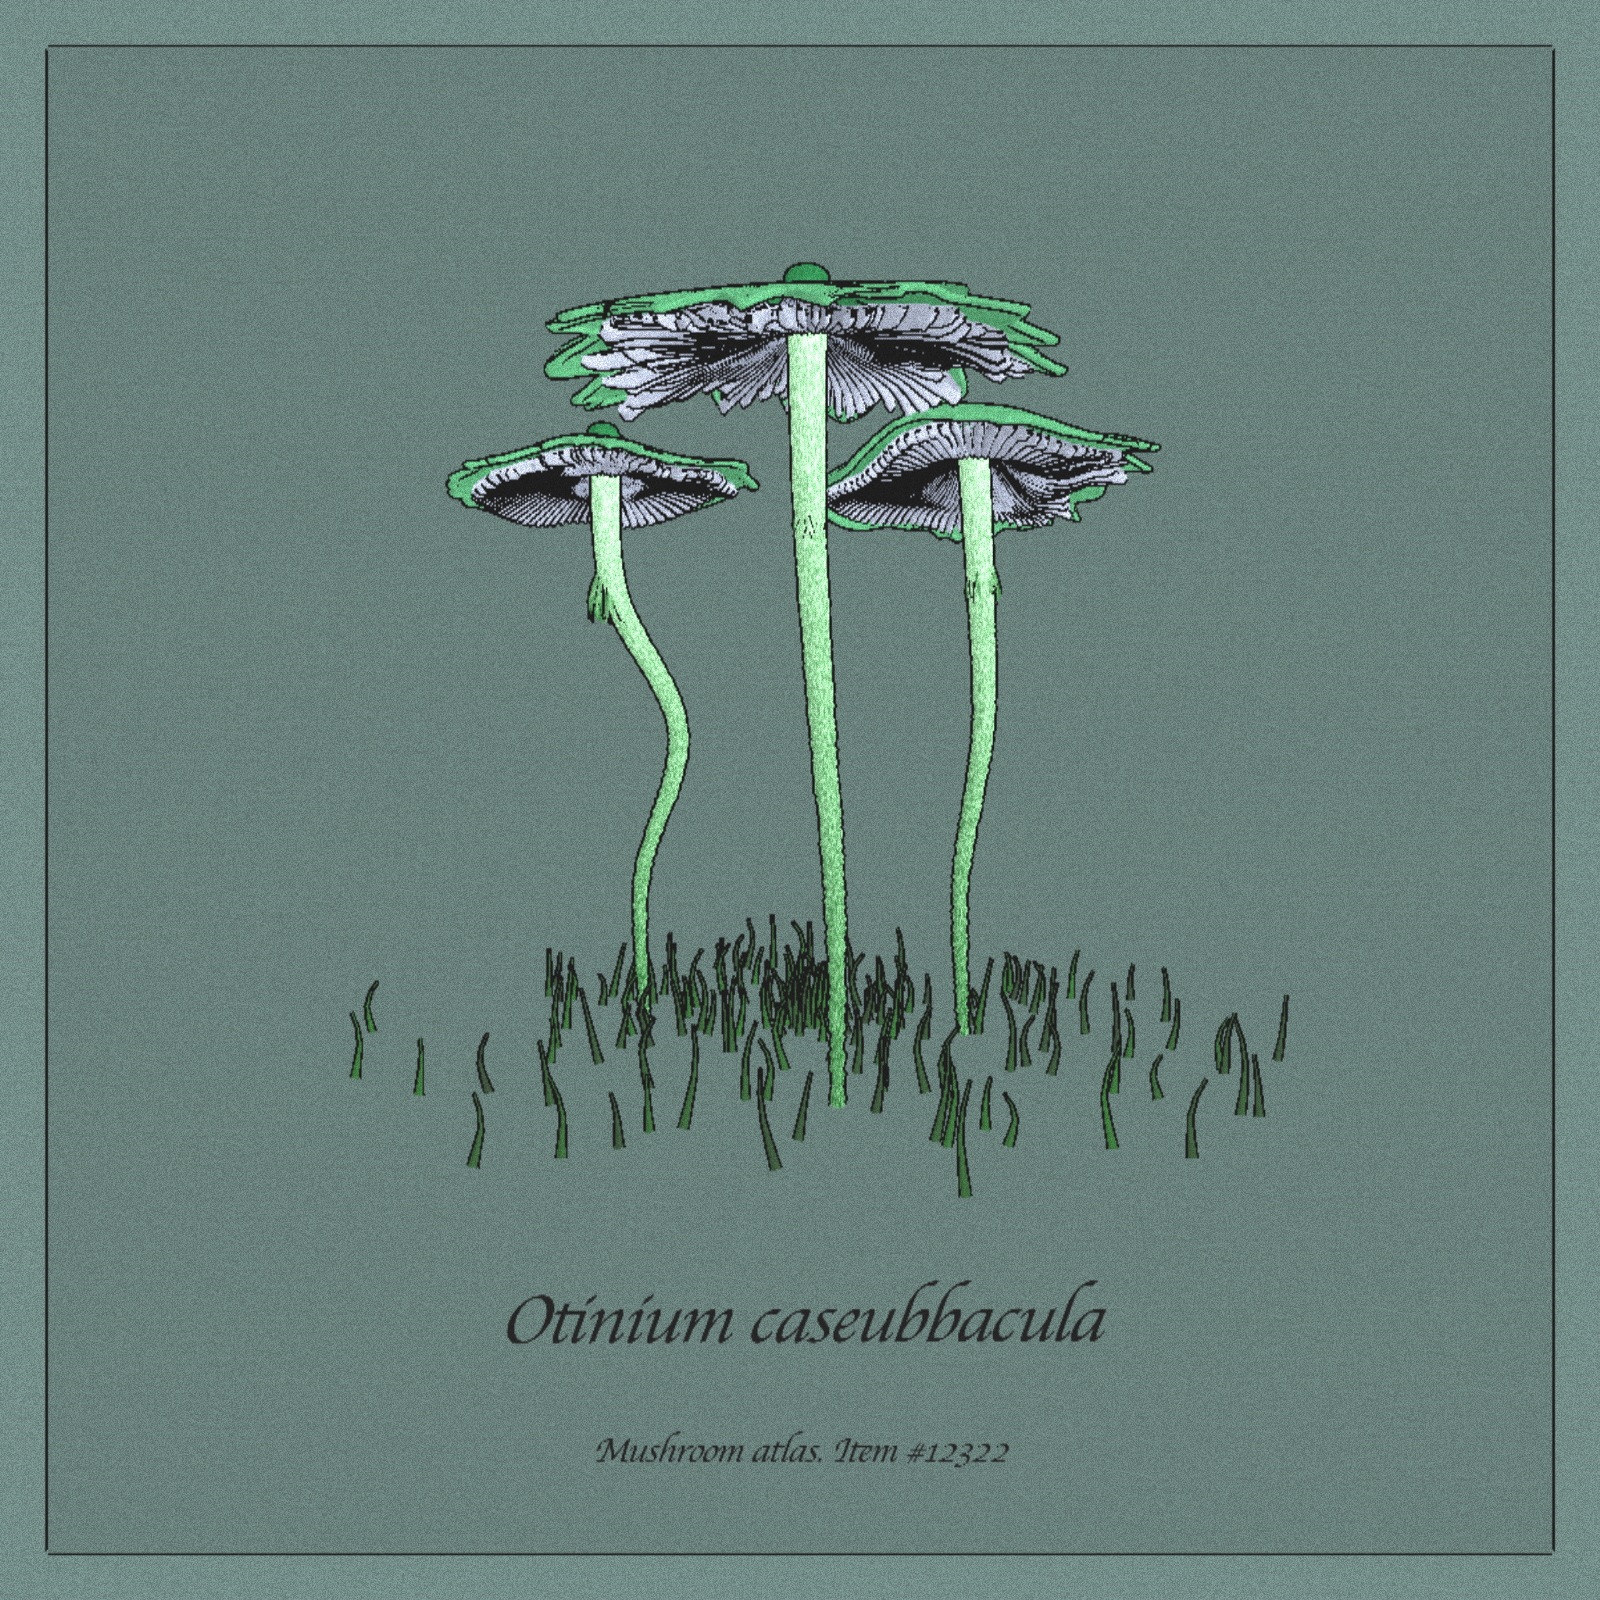
Part 2: Drawing a mushroom 🍄
\
\
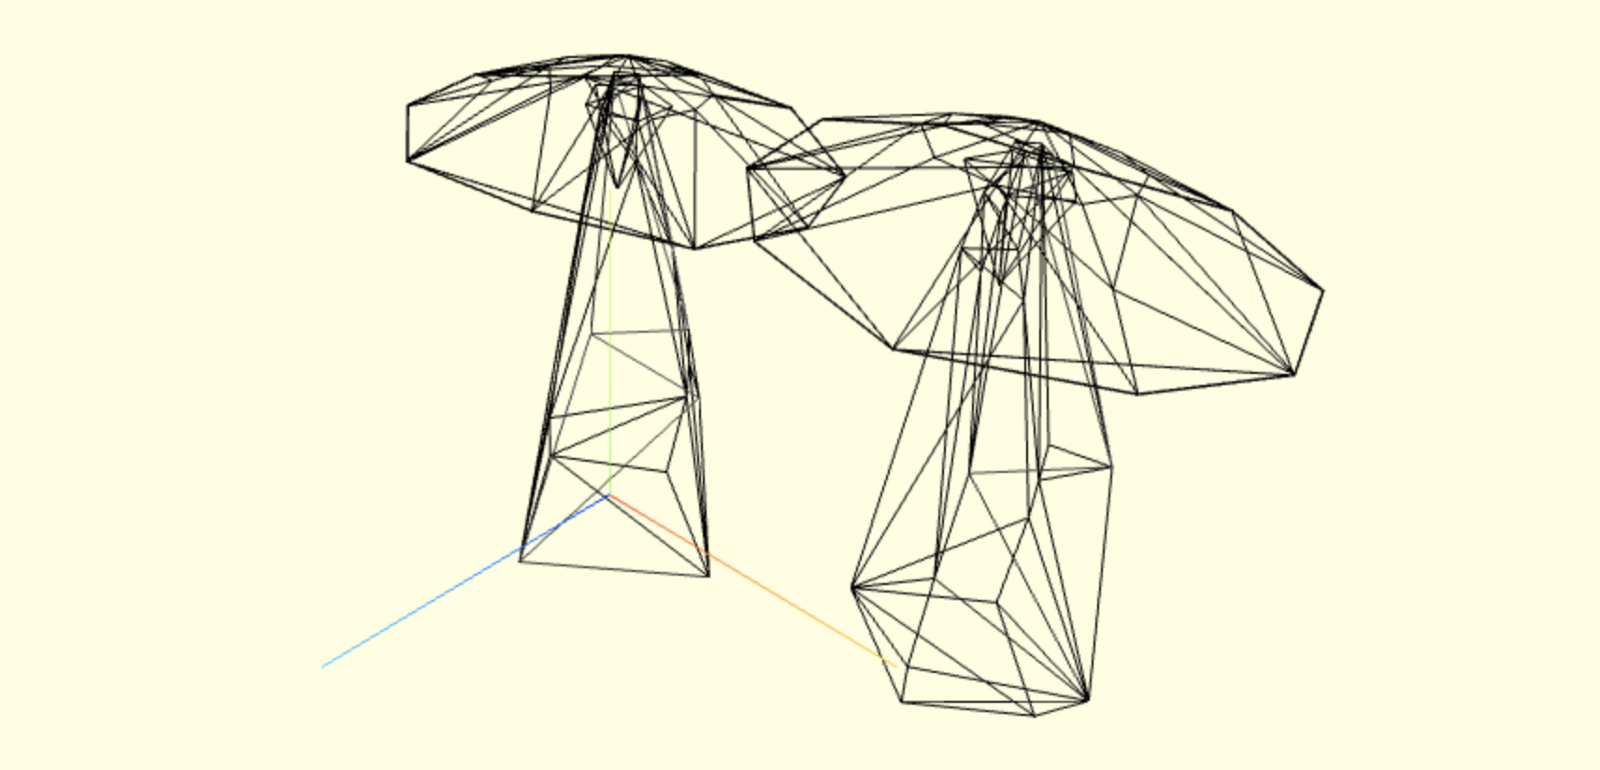
Ok, let’s end up with all that philosophy and move on to the technical part. This project was made entirely using Three.js library, which has a reasonably simple and well-documented API.
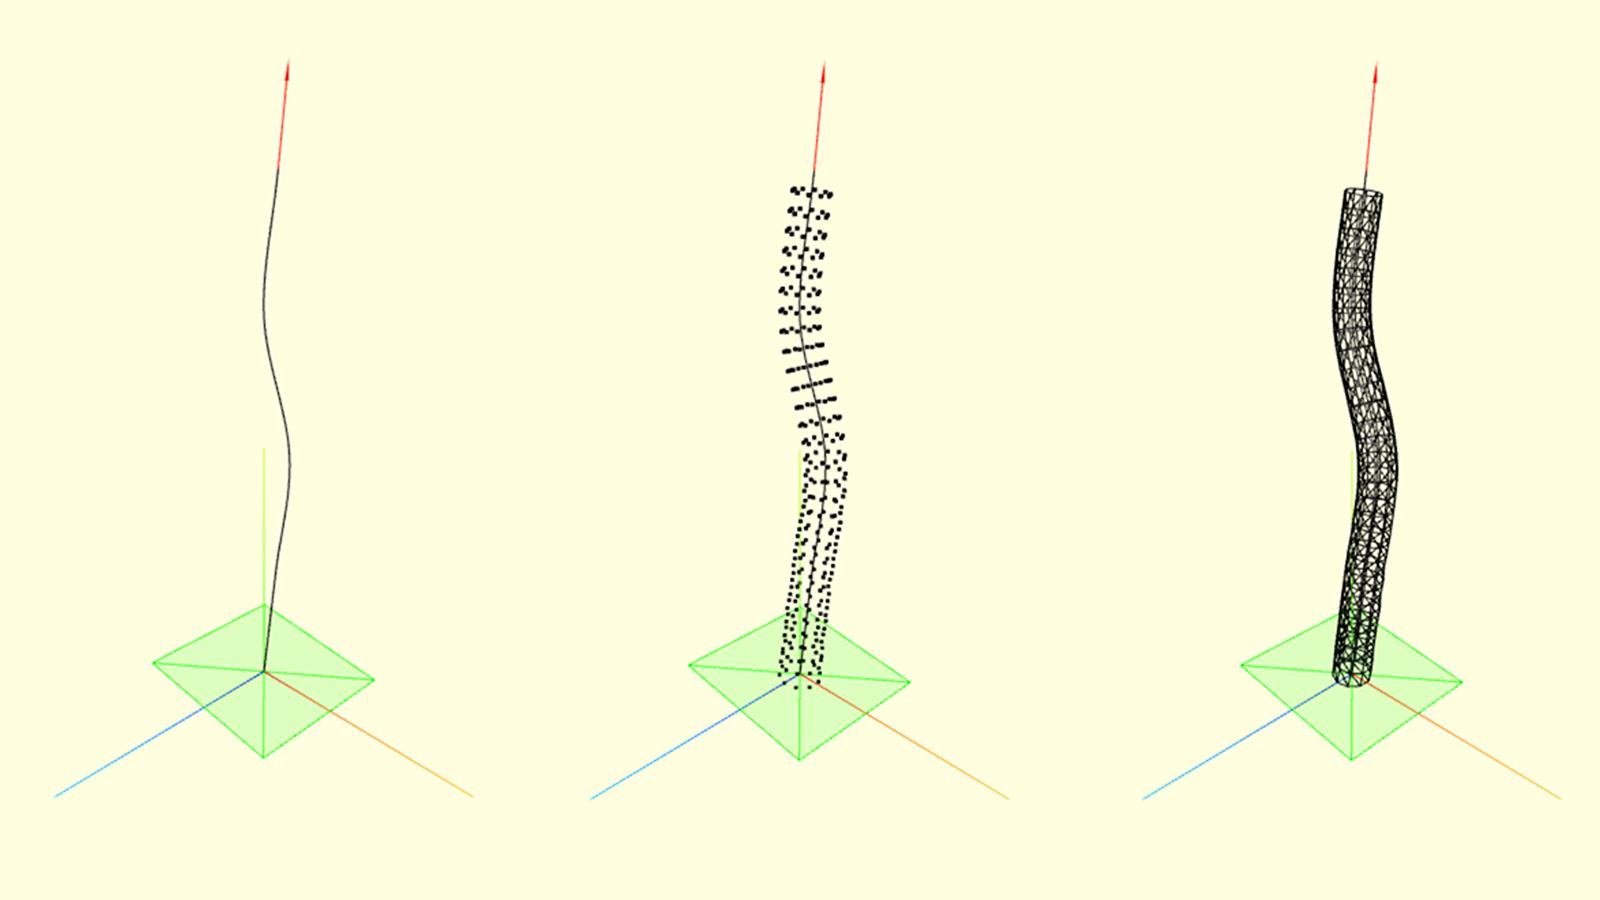
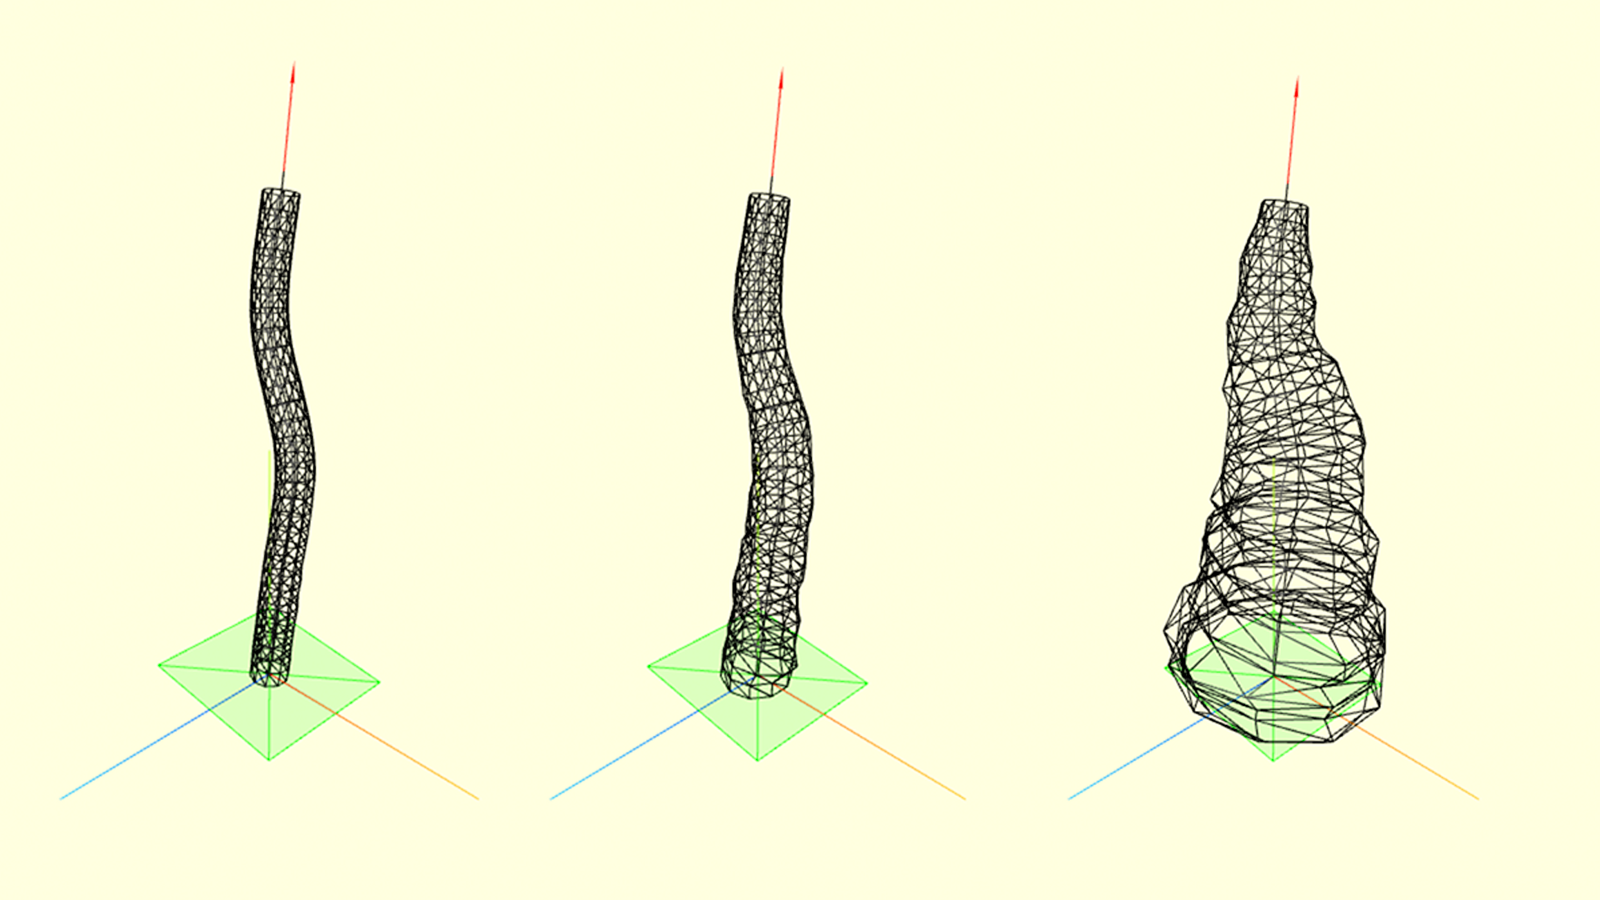
Stipe
Basically, a stipe can be parametrized as a closed contour extrusion along some spline (let’s call it base spline). To create the base spline I used CatmullRomCurve3 class from Three js. Then, I created the geometry vertex-by-vertex by moving another closed shape along the base spline and finally connected those vertices with faces. I used BufferGeometry for that purpose.
\
stipe_vSegments = 30; // vertical resolution
stipe_rSegments = 20; // angular resolution
stipe_points = []; // vertices
stipe_indices = []; // face indices
stipe_shape = new THREE.CatmullRomCurve3( … , closed=false );
function stipe_radius(a, t) { … }
for (var t = 0; t < 1; t += 1 / stipe_vSegments) {
// stipe profile curve
var curve = new THREE.CatmullRomCurve3( [
new THREE.Vector3( 0, 0, stipe_radius(0, t)),
new THREE.Vector3( stipe_radius(Math.PI / 2, t), 0, 0 ),
new THREE.Vector3( 0, 0, -stipe_radius(Math.PI, t)),
new THREE.Vector3( -stipe_radius(Math.PI * 1.5, t), 0, 0 ),
], closed=true, curveType=’catmullrom’, tension=0.75);
var profile_points = curve.getPoints( stipe_rSegments );
for (var i = 0; i < profile_points.length; i++) {
stipe_points.push(profile_points[i].x, profile_points[i].y, profile_points[i].z);
}
}
// <- here you need to compute indices of faces
// and then create a BufferGeometry
var stipe = new THREE.BufferGeometry();
stipe.setAttribute(‘position’, new THREE.BufferAttribute(new Float32Array(stipe_points), 3));
stipe.setIndex(stipe_indices);
stipe.computeVertexNormals();
\
Stipe noise
To be more natural, the stipe surface may somehow vary along with its height. I defined stipe radius as a function of the angle and relative height of the point on the base spline. Then, a slight amount of noise is added to the radius value depending on these parameters.
\
base_radius = 1; // mean radius
noise_c = 2; // higher this – higher the deformations
// stipe radius as a function of angle and relative position
function stipe_radius(a, t) {
return base_radius + (1 – t)*(1 + Math.random())*noise_c;
}
\
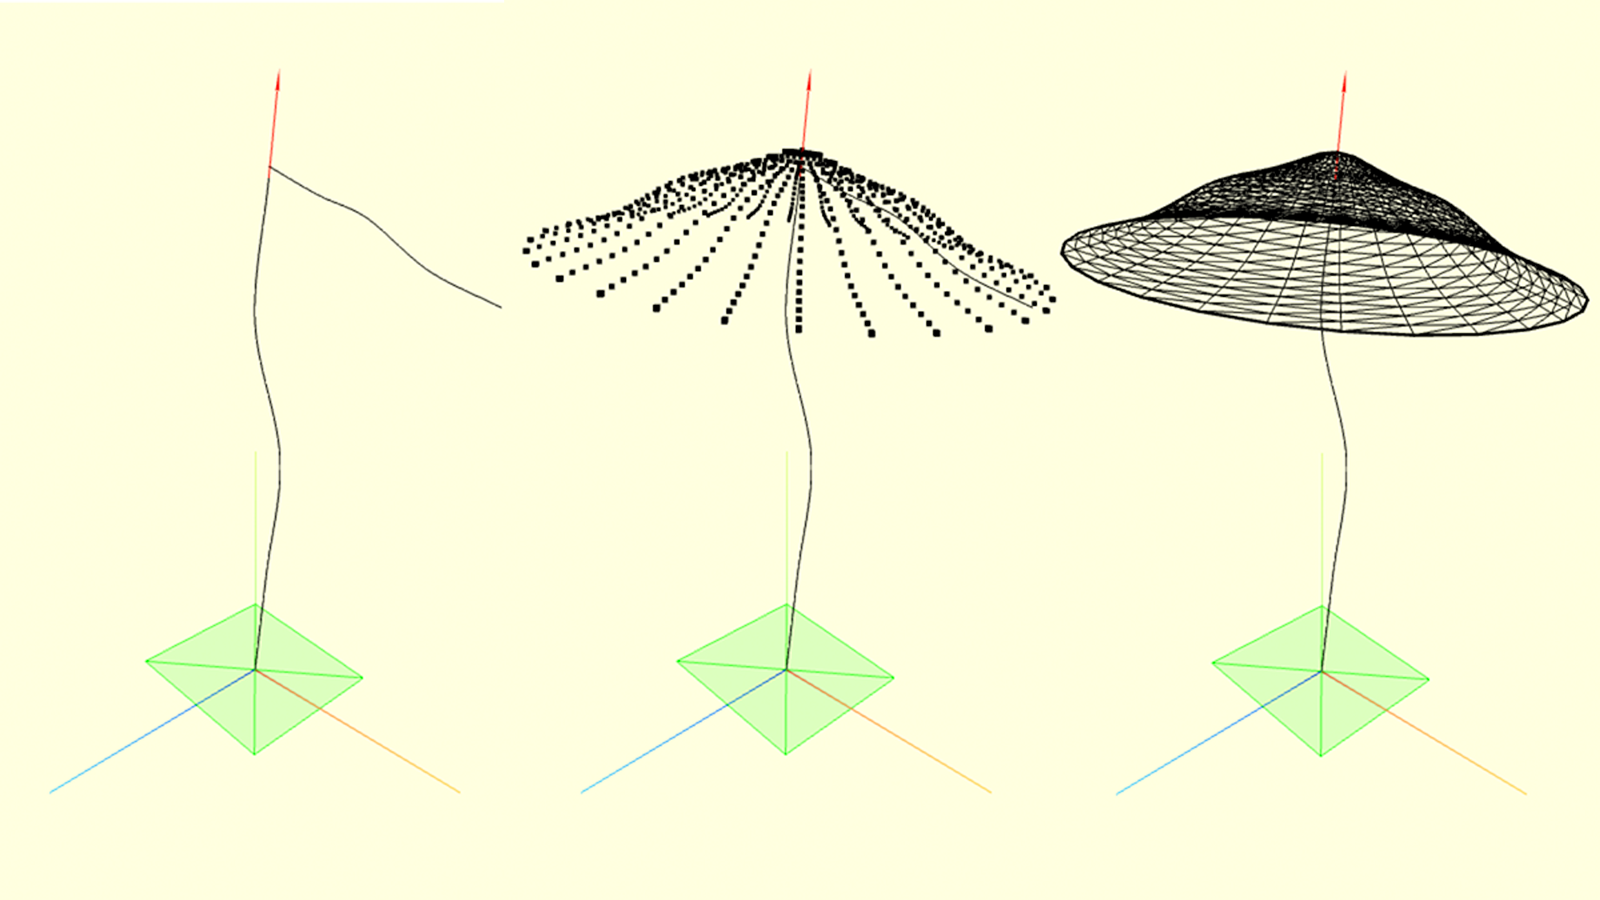
Cap
Cap can also be parameterized as a spline (let’s also call it a base spline) rotating around the top of the stipe. Let’s name the surface spawned by this rotation a base surface. Then base surface will be defined as a function of the position of a point on the base spline and the rotation around the stipe top. This parametrization will allow us to gracefully apply some noises to the surface later.
\
cap_rSegments = 30; // radial resolution
cap_cSegments = 20; // angular resolution
cap_points = [];
cap_indices = [];
// cap surface as a function of polar coordinates
function cap_surface(a0, t0) {
// 1. compute (a,t) from (a0,t0), e.g apply noise
// 2. compute spline value in t
// 3. rotate it by angle a around stipe end
// 4. apply some other noises/transformations
…
return surface_point;
}
// spawn surface vertices with resolution
// cap_rSegments * cap_cSegments
for (var i = 1; i <= cap_rSegments; i++) {
var t0 = i / cap_rSegments;
for (var j = 0; j < cap_cSegments; j++) {
var a0 = Math.PI * 2 / cap_cSegments * j;
var surface_point = cap_surface(a0, t0);
cap_points.push(surface_point.x, surface_point.y, surface_point.z);
}
}
// <- here you need to compute indices of faces
// and then create a BufferGeometry
var cap = new THREE.BufferGeometry();
cap.setAttribute(‘position’, new THREE.BufferAttribute(new Float32Array(cap_points), 3));
cap.setIndex(cap_indices);
cap.computeVertexNormals();
\
Cap noise
To be more realistic, the cap also needs some noise. I divided cap noise into 3 components: radial, angular and normal noises. Radial noise affects the relative position of the vertex on the base spline. Angular noise changes the angle of base spline rotation around the top of the stipe.
\
And finally, normal noise changes the position of the vertex along the base surface normally at that point. While defining the cap surface in a polar coordinate system it’s useful to apply 2d Perlin noise for these distortions. I used noisejs library for that.
\
function radnoise(a, t) {
return -Math.abs(NOISE.perlin2(t * Math.cos(a), t * Math.sin(a)) * 0.5);
}
function angnoise(a, t) {
return NOISE.perlin2(t * Math.cos(a), t * Math.sin(a)) * 0.2;
}
function normnoise(a, t) {
return NOISE.perlin2(t * Math.cos(a), t * Math.sin(a)) * t;
}
function cap_surface(a0, t0) {
// t0 -> t by adding radial noise
var t = t0 * (1 + radnoise(a, t0));
// compute normal vector in t
var shape_point = cap_shape.getPointAt(t);
var tangent = cap_shape.getTangentAt(t);
var norm = new THREE.Vector3(0,0,0);
const z1 = new THREE.Vector3(0,0,1);
norm.crossVectors(z1, tangent);
// a0 -> a by adding angular noise
var a = angnoise(a0, t);
var surface_point = new THREE.Vector3(
Math.cos(a) * shape_point.x,
shape_point.y,
Math.sin(a) * shape_point.x
);
// normal noise coefficient
var surfnoise_val = normnoise(a, t);
// finally surface point
surface_point.x += norm.x * Math.cos(a) * surfnoise_val;
surface_point.y += norm.y * surfnoise_val;
surface_point.z += norm.x * Math.sin(a) * surfnoise_val;
return surface_point;
}
\
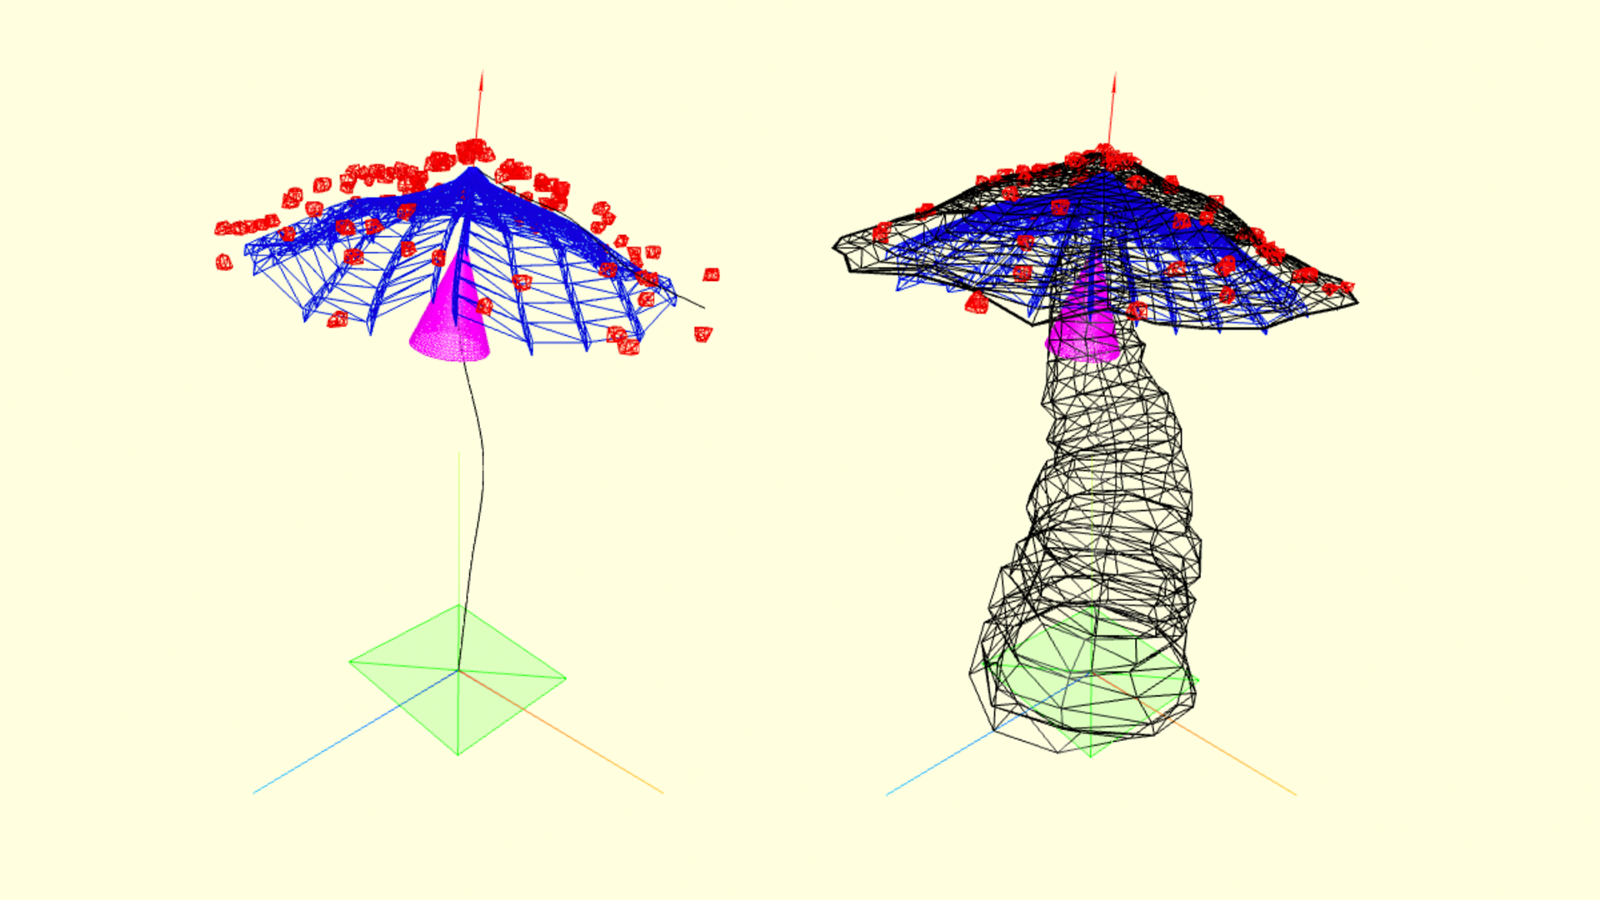
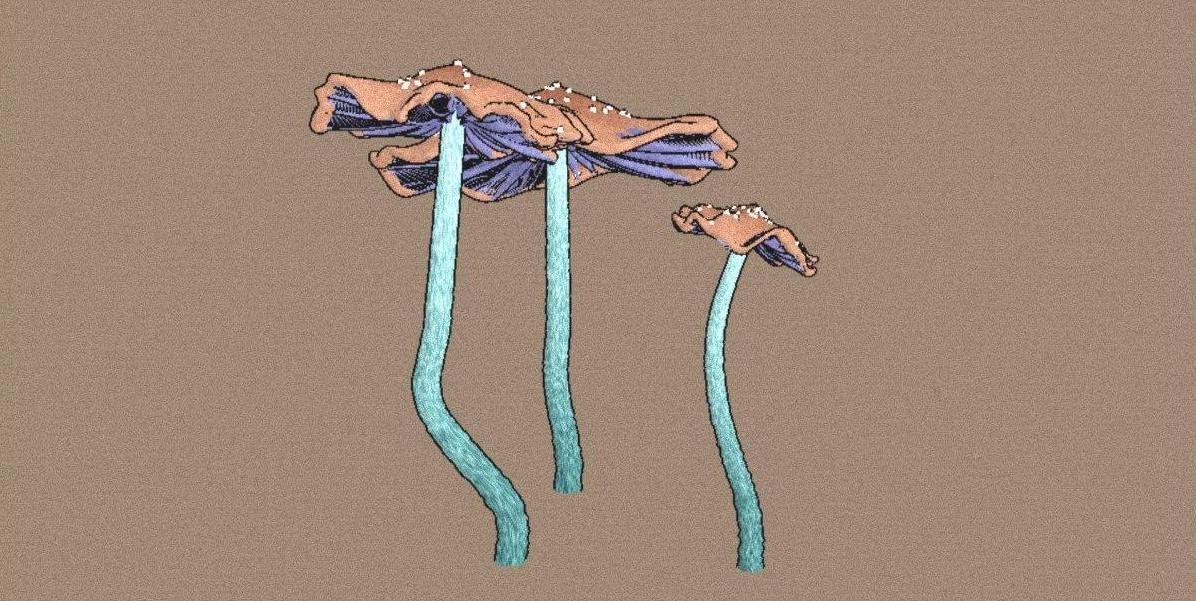
The rest of the shroom: scales, gills, ring
The geometries of the gills and ring are very similar to the geometry of the cap. An easy way to create scales is to spawn noisy vertices around some random anchor points on the cap surface and then create ConvexGeometry based on them.
\
bufgeoms = [];
scales_num = 20;
n_vertices = 10;
scale_radius = 2;
for (var i = 0; i < scales_num; i++) {
var scale_points = [];
// choose a random center of the scale on the cap
var a = Math.random() * Math.PI * 2;
var t = Math.random();
var scale_center = cap_surface(a, t);
// spawn a random point cloud around the scale_center
for (var j = 0; j < n_vertices; j++) {
scale_points.push(new THREE.Vector3(
scale_center.x + (1 – Math.random() * 2) * scale_radius,
scale_center.y + (1 – Math.random() * 2) * scale_radius,
scale_center.z + (1 – Math.random() * 2) * scale_radius
);
}
// create convex geometry using these points
var scale_geometry = new THREE.ConvexGeometry( scale_points );
bufgeoms.push(scale_geometry);
}
// join all these geometries into one BufferGeometry
var scales = THREE.BufferGeometryUtils.mergeBufferGeometries(bufgeoms);
\
Collisions check
To prevent unreal intersections when spawning multiple mushrooms in the scene one needs to check collisions between them. Here I found a code snippet that checks collisions using raycasting from each mesh point.
\
To reduce computation time I generate a low-poly twin of the mushroom along with the mushroom itself. This low-poly model then is used to check collisions with other shrooms.
\
for (var vertexIndex = 0; vertexIndex < Player.geometry.attributes.position.array.length; vertexIndex++)
{
var localVertex = new THREE.Vector3().fromBufferAttribute(Player.geometry.attributes.position, vertexIndex).clone();
var globalVertex = localVertex.applyMatrix4(Player.matrix);
var directionVector = globalVertex.sub( Player.position );
var ray = new THREE.Raycaster( Player.position, directionVector.clone().normalize() );
var collisionResults = ray.intersectObjects( collidableMeshList );
if ( collisionResults.length > 0 && collisionResults[0].distance < directionVector.length() )
{
// a collision occurred… do something…
}
}
\
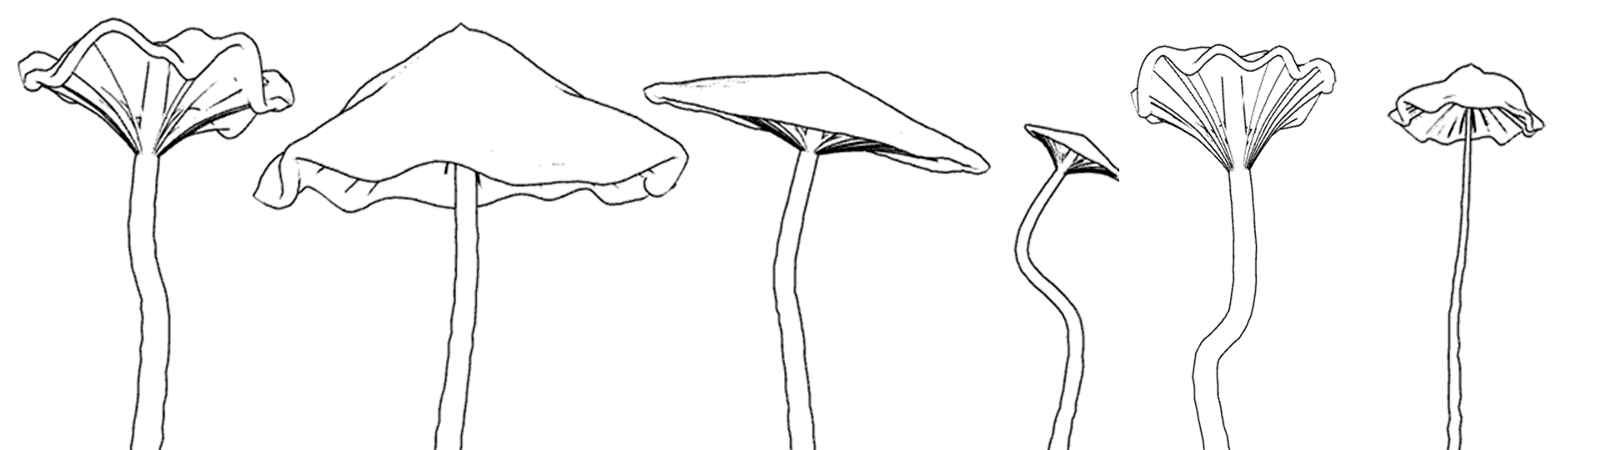
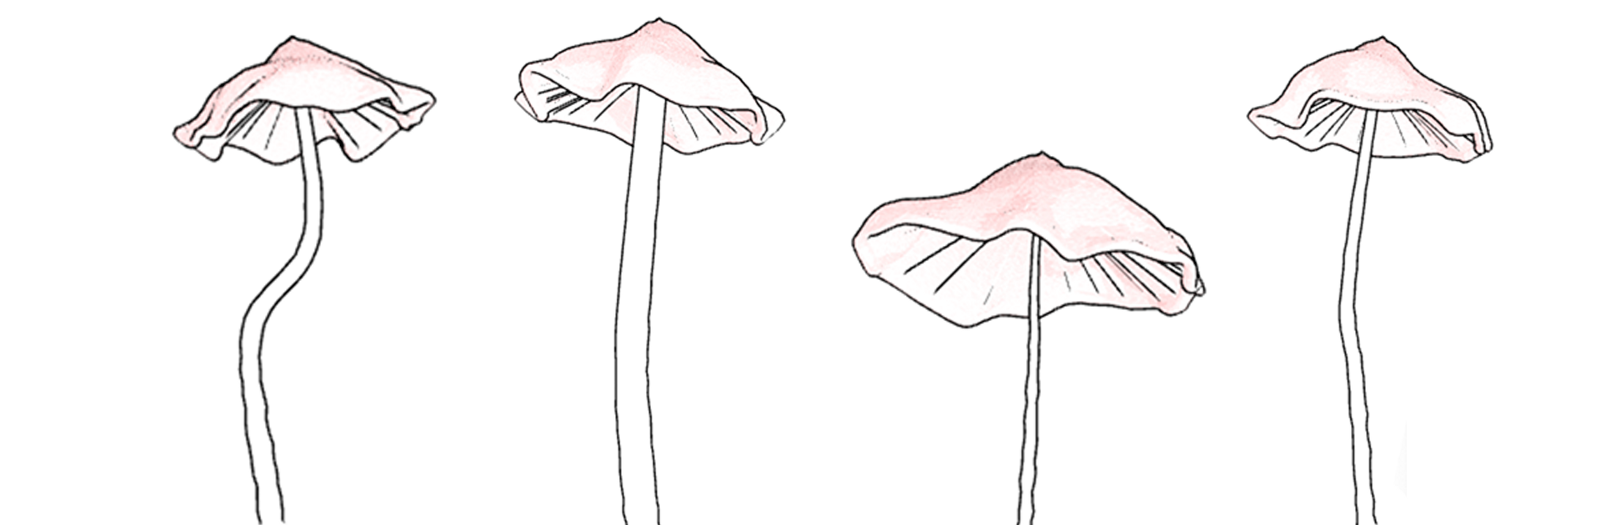
Rendering and stylization
Initially, I wanted to achieve an effect of 2d-drawing despite all the generation being made in 3d. The first thing that comes to mind in the context of stylization is the outline effect. I’m not a pro in shaders so I just took the outline effect from this example. Using it I got a nice pencil style of the shroom contour.
\
\
The next thing on the way back to 2d is proper colorization. The texture should be a bit noisy and have some soft shadows. There is a lazy hack for those who, like me, don’t want to deal with UV-maps. Instead of generating a real texture and wrapping it using UV one can define vertex colors of an object using BufferGeometry API. More than that, using this approach the color of a vertex can be also parameterized as a function of angle and position, so the generation of a noisy procedural texture becomes slightly easier.
\
\
Finally, I added some global noise and film-like grain using EffectComposer.
\
var renderer = new THREE.WebGLRenderer({antialias: true});
outline = new THREE.OutlineEffect( renderer , {thickness: 0.01, alpha: 1, defaultColor: [0.1, 0.1, 0.1]});
var composer = new THREE.EffectComposer(outline);
// <- create scene and camera
var renderPass = new THREE.RenderPass( scene, camera );
composer.addPass( renderPass );
var filmPass = new THREE.FilmPass(
0.20, // noise intensity
0.025, // scanline intensity
648, // scanline count
false, // grayscale
);
composer.addPass(filmPass);
composer.render();
\
Name generation
For name generation, I used a simple Markov chain which was trained on 1k mushroom names from here. To preprocess and tokenize those names I used the python library YouTokenToMe. With it, I split all names into 200 unique tokens and wrote their transition probabilities to a javascript dictionary. The JS side of the code only reads those probabilities and stacks tokens until it generates a couple of words.
\
Here are some samples of mushroom names generated using this approach:
\
Stricosphaete cinus
Fusarium sium confsisomyc
Etiformansum poonic
Hellatatum bataticola
Armillanata gossypina mortic
Chosporium anniiffact
Fla po sporthrina
\
Part 3: Finalizing
Preparing for the drop
To prepare a project for a release on fxhash one simply needs to change all random calls in the code to the fxrand() method as described here. The main idea is that your code must generate unique outputs for each hash but exactly the same output for the same hash. Then test the token in the sandbox and finally mint it when the minting will be opened. That’s it!
\
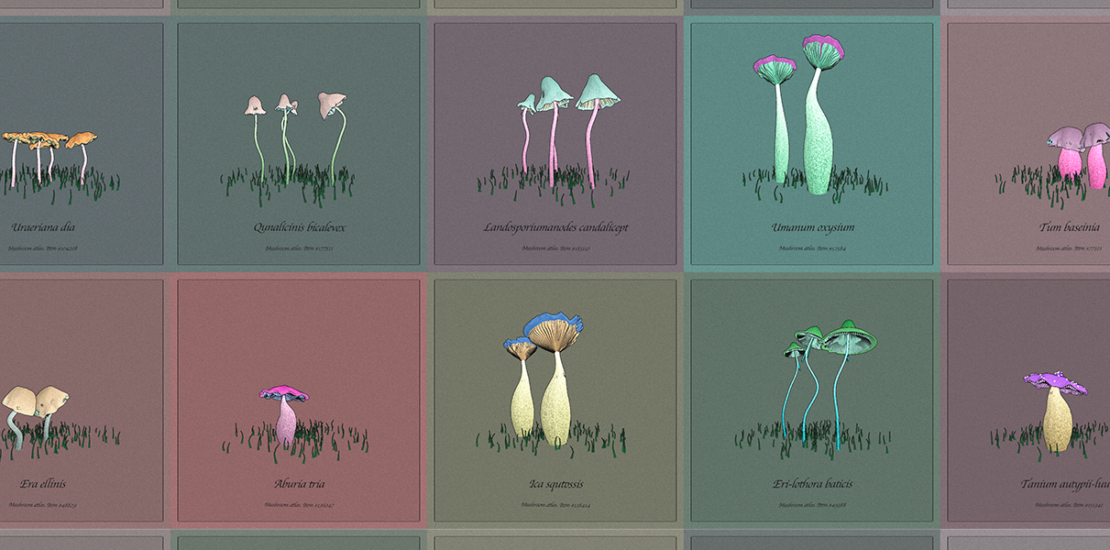
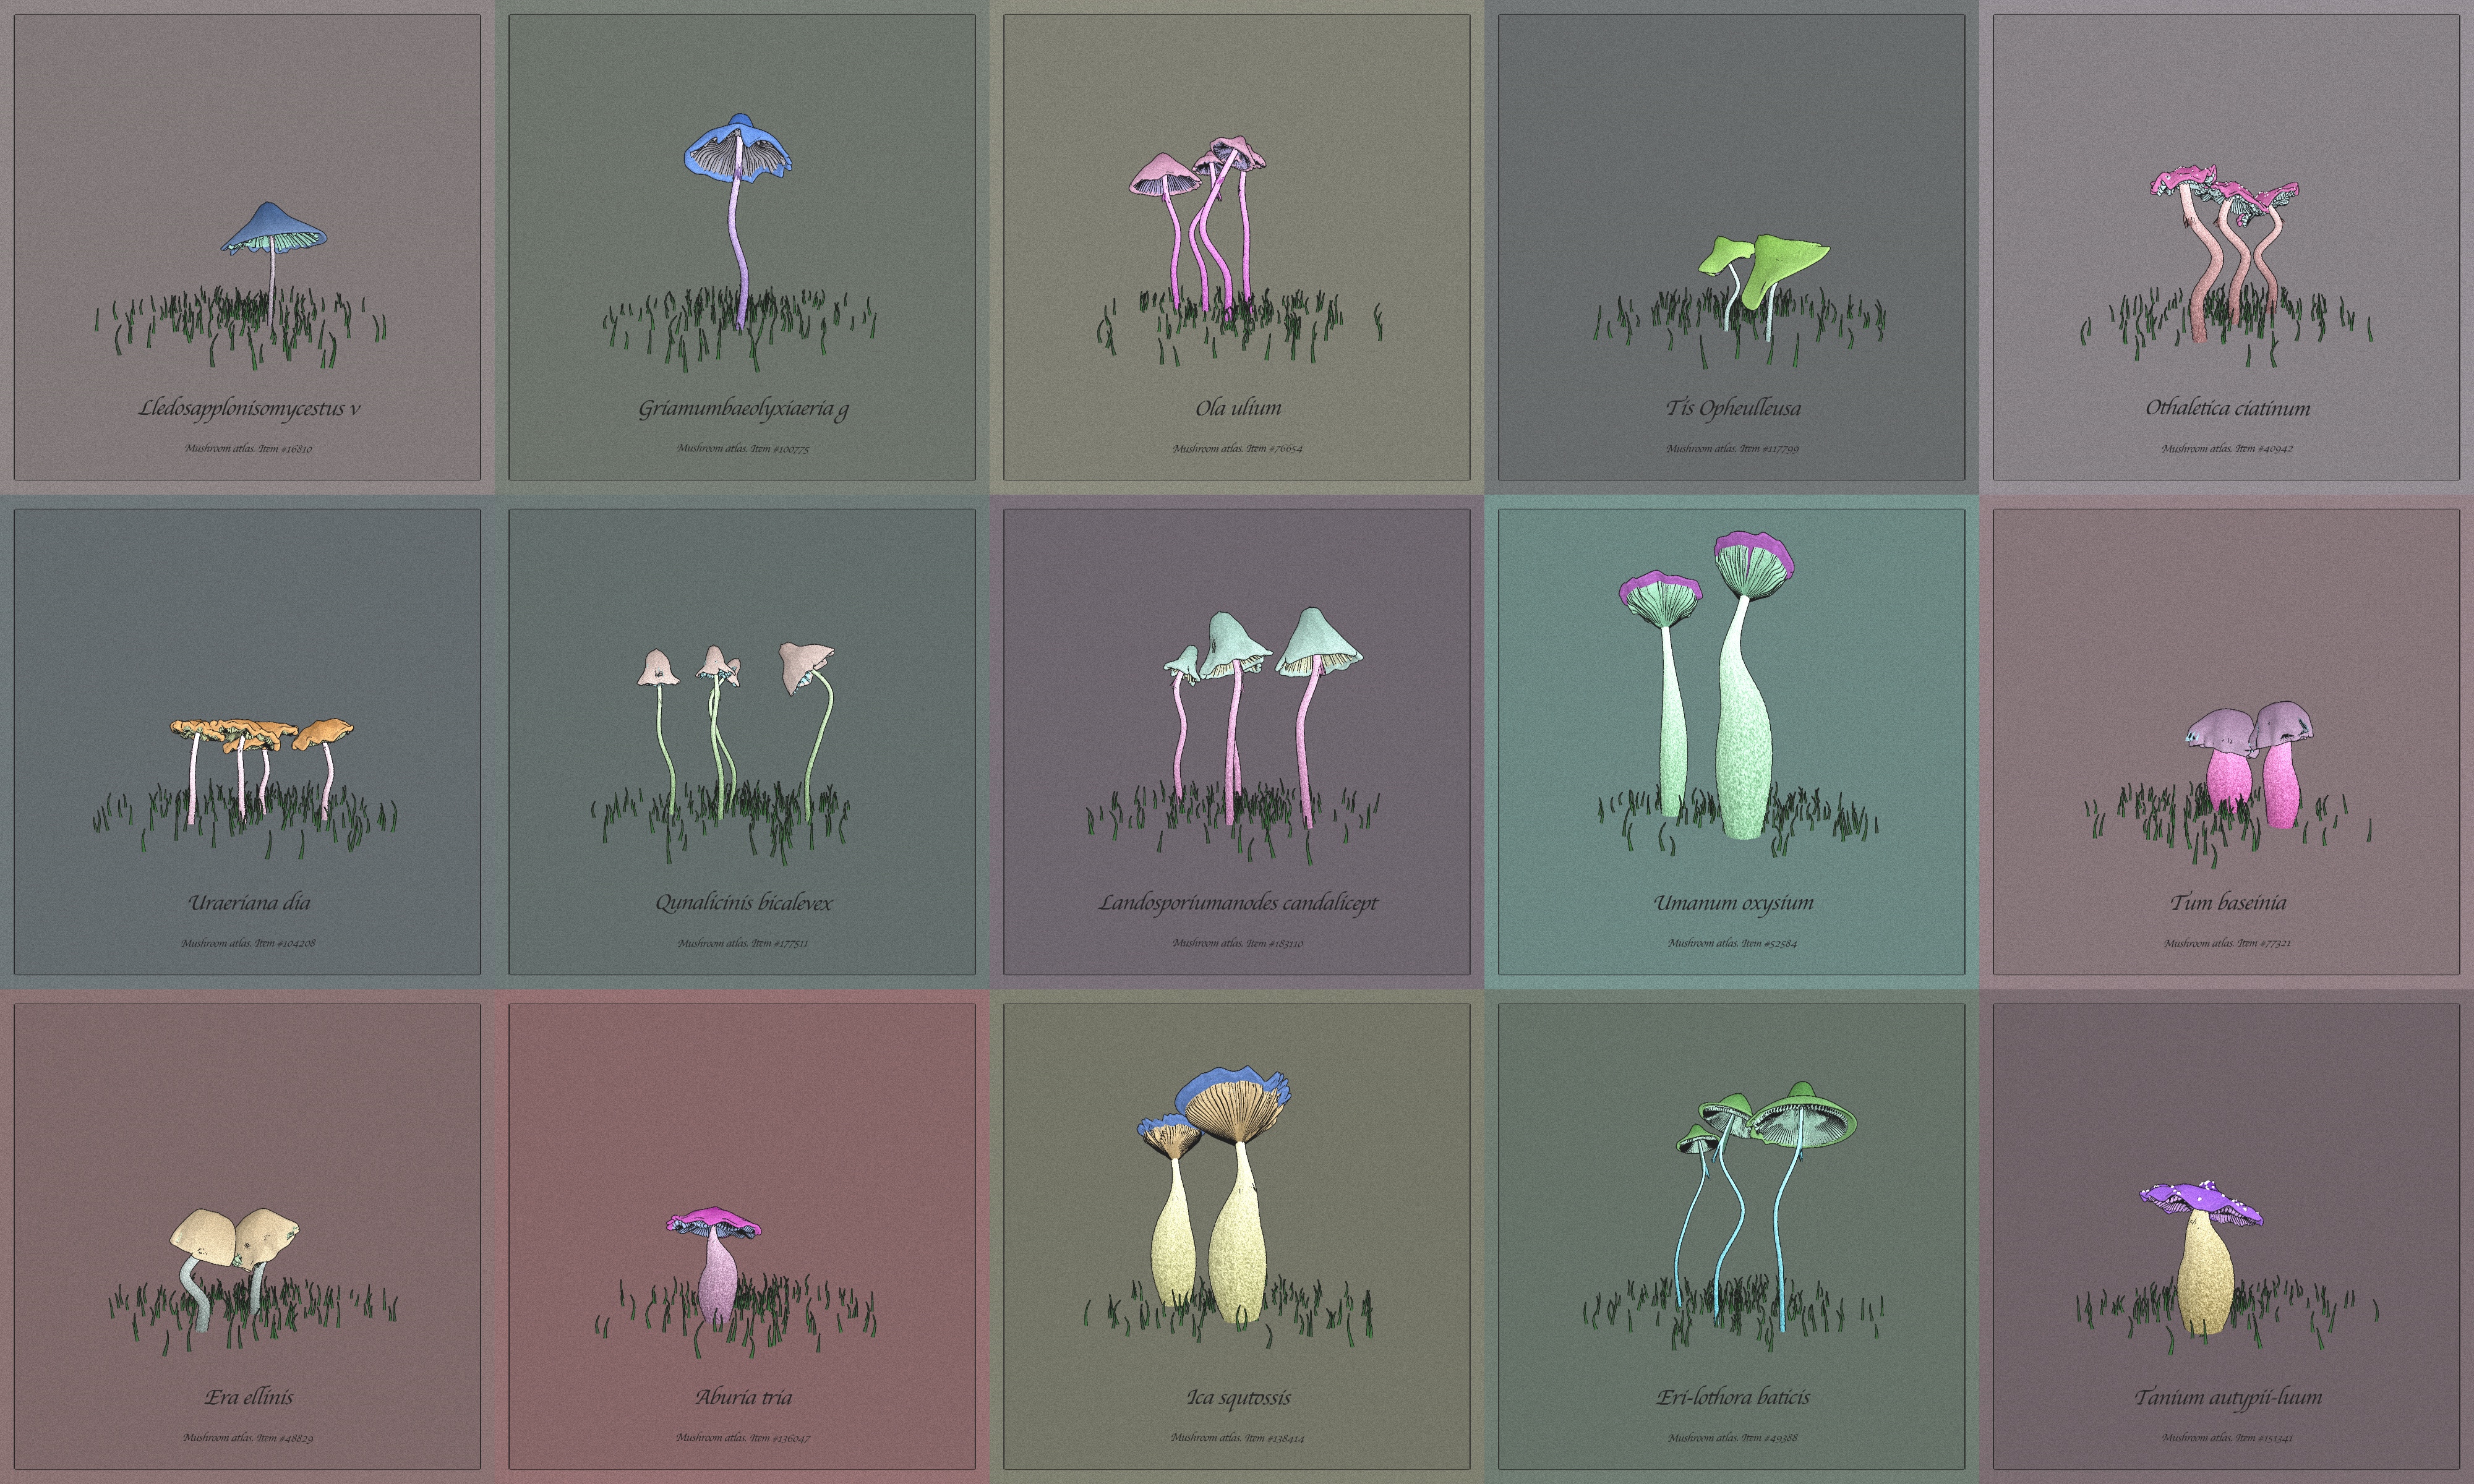
This brings us to the Mushroom Atlas (what I named this collection). You can check it out and see its variations here. Although it was not sold out like some of my previous works, I think that this is the most advanced and challenging thing that I’ve made in generative art yet. Hope that those who minted this token also enjoyed their fungi in the non-fungible world!
Links
Three.js documentation
Check it out on fxhash!
My Twitter
\
